Saturday, November 06, 2010

Designing Repton's Lost Realms

If you've been here before, you'll probably already know that this year is Repton's 25th anniversary. And, as part of the celebrations, Retro Software is releasing Repton: The Lost Realms for the BBC Micro and Acorn Electron.

I've already blogged about creating the cover artwork and the loading screen for the game. However today is the 6th November and Repton: The Lost Realms is being officially launched at R3PLAY in Blackpool. That means I can at last talk about creating the graphics for the game itself.

My cover artwork

I was first approached by Dave Moore about contributing to Repton: The Lost Realms in mid 2008. Peter Edwards had just recovered a load of my old Repton 3 and Repton Infinity screens from some of my 5.25" floppies and the graphics in them had impressed Peter and Dave enough for them to ask if I would be interested in creating some screens and graphics for Repton: The Lost Realms.

Like Repton 3 before it, Repton: The Lost Realms is a game that allows you to not only edit its levels, but also redefine its graphics. That means that it's possible to provide a selection of different screens and graphics for players to load into the game.

Lost Realms as I first received it

At this stage, the Repton: The Lost Realms came with only one set of screens. As you can see above, it used the Repton 3 graphics with a few additional graphics for the game's new elements designed by the game's original programmer Paras Sidapara.

As there were to be four sets of six screens included in the game, my first idea was to theme each set of graphics around the existing Repton releases. In other words, have a Repton 1 set...

Repton 1 Lost Realm

...a Repton 2 set...

Repton 2 Lost Realm

...a Repton 3 set...

Repton 3 Lost Realm

...and a new set for the final set of screens.

I quickly hacked about and transferred the graphics from these games into Repton: The Lost Realms. At this stage I was designing new characters in the Repton Infinity graphics editor (Film Strip) and then transferring them over to Repton: The Lost Realms by transferring blocks of data between files using the BBC BASIC command line.

Film Strip - An excellent graphics editor

The reason why I preferred Film Strip was that it was designed for use with a keyboard. I didn't have a real BBC Micro to use so I was using these programs via the excellent emulator BeebEm. In fact, as at that stage there wasn't a native GNU/Linux emulator for the BBC Micro at the time, I was using BeebEm via WINE.

The Repton 3 and Repton: The Lost Realms editors had adopted the then very fashionable WIMP paradigm. However, using a WIMP interface with a keyboard is very hard going and I found the AMX Mouse option tricky to get working in BeebEm. That meant I couldn't use these editors with my mouse.

Another problem I had with Repton: The Lost Realms' editor was the awful yellow and black colour scheme used for the editor's pointer. It was probably the worst colour scheme you could have picked if you want to design graphics precisely - the outline of the pointer gets lost against black, but most of the graphics have black backgrounds or outlines!

Repton: The Lost Realms' Editor

After I had designed Repton 1 and Repton 2 themed graphics it soon became obvious that this approach would not work. There were various new elements in Repton: The Lost Realms that were not present in previous Repton games. I wanted to redesign these in each set to match the style of previous Repton releases. However Dave wanted to keep the new game elements that Paras had designed looking the way Paras had designed them. However this would have looked out of place, particularly in Repton 1 which is quite abstract and geometrical in design.

Therefore, after talking it over with Dave and Paras we decided it would be best if I design four completely new sets of graphics for the game, bearing in mind the need to keep the original design of Paras' new game elements in each set. We would also only vary the game characters that varied in the sets of screens supplied with Repton 3: namely the walls, eggs, monsters and crowns.

I had a few ideas for the graphics having got used to playing the game. I didn't think that the inverted cage colour scheme for the anti-clockwise spirits worked at all. I needed to find a way to make these cages look a little less incongruous. I wanted to make the graphics look 1988-ish - so I used the style of later BBC games like Richochet and Star Port as inspiration. And I wanted to use stippled colours as much as possible to make the apparent colour palette seem more than the four colours that the game was limited to.

I designed the set of graphics for the final set of levels (PRESTO) first. My inspiration for these were the full-page adverts for Repton 2 and Repton 3 that Superior Software used to run in Acorn magazines at the time. In particular, I wanted to design a set with light mortar between distressed bricks. I'm very proud of this set and I think it's actually my favourite.

Presto - not for the faint hearted

I got a bit carried away, and I also redesigned Repton to look like he did in Superior's adverts - this was very quickly and firmly rejected, and rightly so!

My Redrawn Repton went down like a cup of cold sick

I had one set down, three more in front of me and even using FilmStrip on a BBC Micro emulator seemed like very hard going. I really wanted to use The GIMP to design the graphics and suddenly it dawned on me that I could.

I could design the graphics in The GIMP and then transfer them to the BBC Micro emulator using the BBC Micro Image Convertor by Francis G Loch. This is an application written in PureBasic that takes image files (bmp, jpg, etc.) and downconverts them into the native screen display formats of the BBC Micro.

The process has a few stages. First I design all the graphics as separate files in The GIMP:
Completed graphics designed in The GIMP

Then I use the GIMP to slice them up and put them in rows:

Sliced and Diced in The GIMP

And finally I convert the graphic into BBC Micro format using the BBC Micro Image Convertor:

And converted to BBC Micro format

So, I fired up The GIMP and the next set I designed was for the LARGO set. This is the default set that loads when the game or editor loads, and the levels in this set were the original six levels designed by Paras Sidapara back in 1988.

Largo - the Realm of the Exile

Because I knew Paras was a huge fan of the game Exile, I decided to base the design of the walls on the walls found in Exile. This set looked very nice and thanks to The GIMP I was able to design them very quickly.

Adagio - Exile crossed with Repton 2

The third set I designed was a set for the ADAGIO screens. This set was a kind of cross between the walls found in Exile and the walls found in Repton 2 (my favourite Repton release). It didn't work as well as I would have liked and I wish I'd done something a bit different.

Allegro - juicy, apparently...

The final set I designed was the ALLEGRO set. It was loosely based on the graphics for the game XOR, which my children were madly into playing at the time. This set has been described as looking "juicy", whatever that means! Dave Moore accused me of taking a little more care over these graphics than some of the others because I knew I was designing all six levels to go with them. How very dare he!

The work on the graphics Repton: The Lost Realms was very straightforward. I did very little rework once we decided on what we were doing and there were only two real debates about the game characters. The first concerned earth, the second concerned fungus.

As far as the earth is concerned, I wanted to experiment with some dense Ravenskull style earth, whereas Dave Moore preferred the very sparse earth used in the Toccata level set of Repton 3. Dave got his way on that one!

Now that's what I call fungus!

The fungus debate concerned my preference for fungus that looked like a toadstool rather than the amorphous mould that was presented in Repton 3. In the end, I redesigned the fungus to look slimy rather than mouldy but it's probably the graphic I am least happy with.

Now that's what I call fun, Gus!

We also had a discussion about the "freeze pill". This was a green pill that froze monsters temporarily. What with absorbalene pills and time pills I thought Repton's drug habit had gone far enough.

Freeze pills - just say no.
 
I wanted to replace it with a Citadel style snowflake. Everyone agreed, and that also involved making changes to the editor and game map graphics which I did by hacking the code about. But, although my snowflake was a good idea, I think the graphic I designed was horrible.

Snow flake - just say yuck.

Once I'd designed all four sets, I thought that that was that - only it wasn't. By this stage Tom Walker (someone for whom the word genius seems utterly inadequate) had joined the project, and had started work coding an Acorn Electron version.

The Acorn Electron is cruelly afflicted in many ways, but one of the worst is that it has no hardware scrolling. That is terrible news for a game like Repton which relies on scrolling. Acorn Electron scrolling has to be done in software, which eats up the memory available for the game - and its graphics. The graphics in Acorn Electron Repton: The Lost Realms are 12 x 24 instead of 16 x 32 for the BBC Micro version.

Skull (Acorn Electron)

This meant I had to create cut down versions of all of the games' graphics for the Acorn Electron version, and doing this took as long as it took to create the original graphics. In fact, I put in so much effort I actually prefer some of the Acorn Electron graphics.

Largo - All ready to transfer to Elkulator

Probably the most interesting thing about doing this was the lack of an Acorn Electron editor - or indeed an Acorn Electron version of the game itself! I had actually finished the graphics and put them in game files before Tom had finished coding the Acorn Electron version of the game.

It was quite some time after I had finished the graphics that I was actually able to play with the graphics in the game itself via Tom's excellent Acorn Electron emulator Elkulator.

 Acorn Electron version

Keen eyed Repton fans will notice that Acorn Electron Repton: The Lost Realms reintroduces Tim Tyler's Repton sprite from Repton 2. I think this has much more personality than the one used in Repton 3.

I knew that there was a keen interest in the Repton: The Lost Realms from Acorn Electron enthusiasts so I put an enormous amount of effort in the graphics for the Electron version - I just hope they like them!

And finally -  a word about the design of the crowns. I spent many years living in my wife's home-town of Mélykút, the birthplace and home of the legendary restorer Szvetnik Joachim. He was famous for supervising the return of the Holy Crown of Hungary from the USA in 1977. I went to his workshop in Mélykút to translate for some tourists from New York State, and enjoyed my visit so much I decided to make the crown in ALLEGRO look like the Holy Crown.

Allegro Crown (BBC Micro version)

The other crowns in Repton: The Lost Realms are also based upon real crowns - I wonder if you can work out which ones?

Friday, November 05, 2010

ZX Spectrum +3

Two days ago I blogged about getting nitrofurano's Python ZX Spectrum image filter for The GIMP working, and yesterday I blogged about speeding it up. However, Paulo e-mailed me just after I'd posted and said that the filter wasn't working as it should.

I had assumed that the filter just wasn't supposed to work on small images - such as ones at the ZX Spectrum resolution of 256 x 192. So if we took a 256 x 192 image like this:

Original image at 256 x 192

The best we could hope for would be this:

Put through The GIMP version of filter

However, Paulo pointed out that his sdlBasic version of the filter would produce this:

Put through sdlBasic version of filter

But having looked at the Python code for The GIMP filter he couldn't work out what was wrong. I was intrigued, and decided to have a look too.

Paulo thought that the problem probably lay in one of the loops that were processing the image, but I thought that was unlikely, particularly as he'd checked them so thoroughly against his sdlBasic original. The loops just contained maths, and maths tends to be pretty similar in any language.

Sure enough, the problem lay not in the maths but in the idiosyncratic weirdness of Python. I blame Eric Idle, personally.

The first problem was the way in which Paulo had dimensioned the lists (elderly gentlemen like me call them arrays) he used to work on character blocks. He'd done this:
r0 = [[0] * 8] * 8
g0 = [[0] * 8] * 8
b0 = [[0] * 8] * 8
Which is perfectly sensible, but the problem is in Python almost everything is copied by reference rather than by value. Numbers are copied by value, so [0] * 8 does create a list containing eight different zeros.

However lists are copied by reference so [[0] * 8] * 8 creates a list containing eight references to the same list. That means that any change made to one row of this multidimensional list affects all the other rows too - effectively cutting the resolution of the filter down to the character block level. This caused the blockiness.

To solve it we needed to do this:
r0 = [[None] * 8 for i in range(8)]
g0 = [[None] * 8 for i in range(8)]
b0 = [[None] * 8 for i in range(8)]
What we are doing now is using a list comprehension to create a brand new list eight times, which is what we are after.

Another problem was that instead of referring to the nested lists using list[y][x] Paulo had used list[x][y]. So, for instance we had this:
b0[x2][y2] = str1[2]
g0[x2][y2] = str1[1]
r0[x2][y2] = str1[0]
When we should have had this:
b0[y2][x2] = str1[2]
g0[y2][x2] = str1[1]
r0[y2][x2] = str1[0]
It's very easy to do - in fact I've done it myself. Many times!

Regarding Python's weirdness, it more often works for you than against you and that's why I love the language. For instance, in Paulo's sdlBasic version of the filter he had to do this to swap two values:
if ikattr < paattr:
    tmpr = ikattr
    ikattr = paattr
    paattr = tmpr
Whereas in Python you can use the far more "Pythonic":
if ikattr < paattr:
 ikattr, paattr = paattr, ikattr
Anyway, now the filter was fixed and I could have some fun with some ZX Spectrum proportioned stupid rubbish. Here is Central News at 256 x 192:

It's 1982 again!

And here is a Tyne Tees/Channel 4 endcap - again at 256 x 192:

Unworthy of Half Man Half Biscuit

However, Paulo used it to produce something much grander:

by nitrofurano - Click to enlarge

This isn't the end of the story, unfortunately, as now I have to get the filter's Undo feature working - but tomorrow you'll be pleased to hear there will be something completely different.

The latest version of the ZX Spectrum image filter for The GIMP is available to download from here.

Thursday, November 04, 2010

ZX Spectrum Filter Revisited

Well, a day is a long time in Free Software. Since I posted yesterday about the ZX Spectrum filter for The GIMP, I've had a lovely exchange of e-mails with the original author nitrofurano, I've improved the filter further and I've found out why it was written.

Spectral Spectrum

First things first, improving the filter. I had become rather rusty at working on filters for The GIMP but eventually everything came flooding back to me.

The first thing that helps when writing a Python filter in The GIMP is to run The GIMP from the command line in a terminal window. That way you get to see all the error messages the plug-in produces and are not working "blind". You can also see the output of any print statements you add to help you debug.

The second thing I remembered was that you should use a symbolic link to the filter in The GIMP's plug-in folder, so you can work somewhere more convenient than a hidden folder that's several levels down.

Sugary Spectrum - click to enlarge

Once I'd got myself working sensibly I could have a look at improving the filter. The first thing I did was to speed the filter using this technique described in Akkana's blog.  It cuts down on writing to the actual image, which is slow. Instead you copy the image to a byte array, work with that and then copy all the bytes back to the image when you have finished. Using Akkana's technique had the added bonus of allowing the filter to be adapted easily work with either RGB or RGBA images.

However, the resulting changes didn't seem to generate the desired increase in speed until I realised I had stupidly queried the image class' size and width repeatedly instead of storing the values in variables. Once I did that the filter literally flew.

Nitrofurano (Paulo Silva) has been lovely and very encouraging as I've been hacking his lovely code to bits. He's also as enthusiastic about free software as I am. I think it's fantastic that people who have never met before can work on each other's software, share ideas and get to know each other - the GPL really does work as advertised.

Sinclair TV - thanks to Nitrofurano

The reason the code was written originally was to be part of a very interesting project Paulo is working on to create "retro" vision web-cams. You can find out more about it here.

You can download the updated python-fu ZX Spectrum filter for The GIMP here.

Wednesday, November 03, 2010

Attribute Clash for The GIMP

When I was browsing through The GIMP plug-in registry, I came across a very interesting sounding filter called "zx spectrum filter" by that promised it would imbue your images with all the glorious display limitations of the Sinclair ZX Spectrum.

As it was written in Python I thought I'd give it a go, but the plug-in refused to work. It took about an hour spuddling about to get the plug-in working. The main problem was incorrect indentation - Python is fussy about that. I also added some code to allow undoing and for the plug-in to appear in the Filters menu and then I could start playing!

Before

After

My fixed version of the plug-in can be downloaded from here, and adds the plug-in to Filters -> Artistic -> ZX Spectrum.

GNU/Linux users need to set the Execute permission for the file zxspectrum.py before the The GIMP will recognise it.

The plug-in is a very simple proof of concept and doesn't work particularly well on small (as in ZX Spectrum sized) images as it just averages out the values in character squares, but it certainly creates some interesting effects on large images. 1024 x 768 seems to be the optimum size.

Large images work best

The next step would be to speed it up using the array library and to stop it from falling over nastily if you have an alpha channel on your image - if you do, you'll have to remove it to get the filter to work.

Wednesday, October 27, 2010

Stairways to Starways

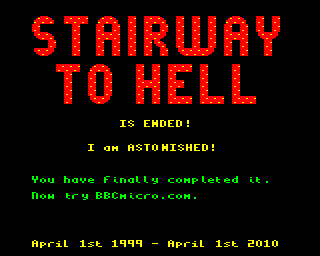
For over ten years now, one of my favourite web-sites has been "The Stairway To Hell".  This web-site has been an invaluable resource to anyone who ever had a BBC Microcomputer or Acorn Electron in their youth. As well as being a fascinating site in its own right, it was also bolstered by a lively and interesting forum.

At the end of March this year Dave Moore, the web-master, decided it was time for a change. His initial plan was to replace the site with a new one - BBCMicro.com - that would be less focused on gaming.

He asked if I could provide an image to close the site down, and thought something similar to the kind of screen you got when you completed one of the Repton games might be nice.

I completed Repton 2 in the GNU/Linux port of the BBC Microcomputer emulator B-Em, screen grabbed the final screen:

Once was enough Tim!

I loaded the BBC Micro version Repton 1 into the screen memory in B-Em so I could cut and paste from the Repton1/2 font:

Repton 1 loaded into the screen memory

Now I used the letters from the Repton 1 screen to edit the Repton 2 screen in The GIMP to say what Dave wanted:

Pristine Screen

However, this didn't really look "retro" enough. The look I was going for was BBC B on badly tuned domestic telly with some interference.

So I ran this image through my own simulated PAL filter which I wrote in Python for The GIMP. Then I used some VHS noise that I extracted from a old recording of ATV Today using Grain Extract and then added it to the image using Grain Merge. I also added a Lens Distortion in The GIMP and desaturated the colours slightly.

Click to enlarge

I was delighted to find out that some people thought the image was actually a real screenshot.

A few months after this picture went up, Dave shelved his plans for BBCMicro.com. His work with the CGEU with organising shows such as R3PLAY and Acorn World meant that he no longer had the time to devote to creating a new site.

However, this wasn't the end, as Peter Edwards stepped in to carry on the good work with a new site called stardot.org.uk. He asked me to amend my image accordingly:

Click to enlarge

Sadly I didn't do such a good job on this image as I was in a hurry - it's a bit dark. But the most important thing is that the on-line Acorn community is thriving and stardot.org.uk looks destined for great things.

Saturday, October 23, 2010

Totally Bazaar

Well, after promising myself I'd get around to doing this long, long ago I've finally put my house (or should that be home?) in order and submitted my Projects folder to the discipline of a version control system.

Nautilus, but nice

I create a huge amount of work on various projects in the course of a year - much of which I blog about here. And I often go back and revisit files numerous times. But to err is human and sometimes I mess things up or find that my new version wasn't the improvement I'd hoped. Therefore I tend to create large numbers of back-ups just in case.

Up until now I've been using an ad hoc system of either backup folders or appending version numbers to the end of file-names. However this is messy, wasteful on disc space and prone to error. That's where a version control system comes in.

Even though version control systems are usually seen as a collaboration tool, they are also a really good idea for personal projects.

I'd actually chosen the version control system I wanted to use a couple of years ago - it's the extremely elegant Bazaar (or BZR), a free software project started by Canonical. The Bazaar project not only encourages personal use of version control - they even provide instructions especially for personal users.

There were three big attractions of Bazaar for me. The first is that it has a single command - bzr. The second is that it puts everything in a single folder /.bzr. I don't need a database or a server or anything like that. And the third is that it takes five minutes to learn. I actually use it from the command line, but there are graphical front ends for it too.

As most of my work these days is either in Python or Inkscape - which are both based on text files - there was no excuse for not using a version control system earlier.

Monday, October 18, 2010

Anchor Revisitation

A little while ago Gareth Randall dropped me a line to let me know he was going to use my Anchor typeface for one of his projects.

Gareth is an award winning promo maker, who I first got to know when was making trails and promotions for ITV.  He was one of the masterminds behind the final London Weekend Television start-up routine.

I was delighted to discover that the project Gareth had in mind was a promotion for the Doctor Who Revisitation Box set. Being a bit of a fan of Terrance Dicks and Robert Holmes this was a huge honour. So, here is Sharaz Jek trying to get Peri to suck his finger. I like to think it was my rather foxy typeface that got him in the mood...

Tight wad won't pay for a colour licence

Thursday, October 07, 2010

Lost In Translation

I've blogged a few times about ClapTraps, the ingenious free software puzzle game written in PyGame and Python by testpilotmonkey. The last time I blogged about it, I mentioned I was planning to add i18n (internationalisation) and a bit of l10n (localisation) to the game.

Claptraps in British English

In terms of internationalisation, what I wanted to do was to make the game multi-lingual so that on my daughters' computer, where they use Hungarian rather than English, they would be able to play the game in Hungarian.

I had been under the mistaken impression that all I needed to do to prepare a Python script for i18n was to import the gettext library and then surround all translatable strings with the function _().

It turned out to be a little bit more complicated than that. The reason was that I wanted ClapTraps to stay self contained in a single folder rather than force the user to install it.

ClapTraps' self-contained folder structure

Normally when GNU/Linux programs are installed on a computer, the compiled translation scripts are copied to a central location for access by all users of the computer. On Fedora GNU/Linux, that location is /usr/share/locale. Python always expects the compiled translation files to be stored there. However, I wanted my translations to remain in the ClapTraps folder.

It would have taken me quite some time to work out what to do if Mark Mruss had not already solved all the problems for me in his excellent blog post on translating Python/PyGTK programs. There's a fantastic snippet of code there called "Translation stuff" that magically does it all!

The next step, now I had the Python script prepared, was to generate a POT (Portable Object Template) file. The POT file is the template file from which individual translations can be prepared.

The POT file for ClapTraps

It contains a header, then a list which shows the line a translatable string appears in, the id of the translatable string, and a space for the translation.

I found one problem when first creating my POT file was that it only had five strings in it! The reason was that testpilotmonkey had used single quotes for most of his strings but xgettext, the tool you use to create a POT file, only recognises double quotes.

From my POT file, I used the msginit tool to create two PO (Portable Object) files - one for en_GB (British English), the other for hu (Hungarian). Now came the really hard part - the Hungarian translation! I did this myself, but it took me three days until I was happy. The main problem was my difficulty with the imperative mood in Hungarian. Fortunately the excellent website HungarianReference.com helped enormously. My Hungarian is still a bit dodgy, but I like to think that adds to the charm.

Finished PO file with Hungarian translation

Now all I needed to do was compile my PO files in MO files and I could see if it worked. To test the game I used the LANG variable from the command language.

To force the game to run in Hungarian whilst running Fedora 13 in British English I typed LANG=hu python claptraps and....

Magyar and testpilotmonkey - a tricky combination!

Success! That was a lovely feeling. Now the next challenge was a bit of l10n. The problem I faced was that ClapTraps regularly asks the user to press Y for Yes or N for No. But in Hungarian that should be I for Igen or N for Nem. So I needed some way of changing the keys that you need to press to suit the current language.

This turned out to be quite easy - first I had to import the locale library. Next, I just needed to ask the locale class for the initial letters used for "yes" and "no" in a language like this:

# Make lists of "yes" and "no" keys for current language
locale.setlocale(locale.LC_ALL, '')
yes_keys=list(locale.nl_langinfo(locale.YESEXPR)[2:-3]);
no_keys=list(locale.nl_langinfo(locale.NOEXPR)[2:-3]);

The nl_langinfo function returns a regular expression string with the acceptable keys for Yes or No for the current locale. For English it would be:

^[yY].*
^[nN].*

For Hungarian it would be:

^[IiyY].*
^[nN].*

Note that Y is also acceptable for Hungarian. I used the Python slice operator to slice off the bits I didn't want and then bunged the result in a variable. So now, when I want the user to press yes or no I simply do this:

while(1):
    wait_event = pygame.event.wait()
    if wait_event.type == pygame.KEYDOWN:
        if pygame.key.name(wait_event.key) in yes_keys:
        return False
    elif pygame.key.name(wait_event.key) in no_keys:
        program_quit = False
        break 
    else:
        pass

And that solves it. Since I made these changes to ClapTraps my daughters have both had hours of fun out of the game. It's a tribute to the genius of testpilotmonkey - and Richard Stallman. For, without the GPL, I wouldn't have been free to make these changes which allowed my children to enjoy this fantastic piece of software.

Wednesday, October 06, 2010

Per ardua, ad astra

Recently I wrote about the flyers I created for the R3PLAY Arcade, Retro and Video Gaming Expo that's going to be held in Blackpool on the 6th and 7th November 2010. Here's Doris Speed holding an example:

Some people are so easily pleased

At the same time as I put flyers together, I also prepared two half page magazine advertisements to appear in retroGAMER and gamesTM magazines.

This was a very exciting job for me, as I've always wanted some of my work to appear in a computer magazine, and retroGAMER was a magazine I used to buy regularly when I lived in the UK.

The fliers were produced as large uncompressed TIFF files. I exported large PNG files from the Inkscape source file and then converted them into TIFFs using The GIMP.

I was delighted this morning when Dave Moore, one of the organisers of R3PLAY, sent me a picture of the adverts appearing in the magazines themselves.

In retroGAMER...

Click to enlarge

 ...and in gamesTM.

Click to enlarge

The R3PLAY Arcade, Retro and Video Gaming Expo is going to be held in Norbreck Castle, Blackpool on the 6th and 7th of November 2010. You can order tickets from www.r3play.info, in-store at WHO, 30-32 Coronation Street, Blackpool or by phone on 01253 291188.