

One of Roddy’s cracking contraptions
One of the subjects recently covered on Roddy’s blog is the home-made telecine machine he built. The telecine was a device invented by John Logie-Baird at the very dawn of broadcasting (he began work on telecine back in the 1920s) for transferring pictures from film to television.
Roddy also shares my love of everything ATV, so naturally one of the first films Roddy used to demonstrate his telecine was a 16mm film copy of the ATV Today title sequence from 1976.
This title sequence was used from 1976-1979 and proved so iconic (no doubt helped immeasurably by the rather forgetful young lady who forgot to put her dress on) it is often used to herald items about ATV on ITV Central News. Sadly, as you can see below, the sequence was not created in widescreen so it usually looks pretty odd when it’s shown these days.
How the sequence looks when broadcast these days.
The quality of Roddy’s transfer was so good I thought it really lent itself to creating a genuine widescreen version. In addition, this would provide me with a perfect opportunity to learn some more about animating using the free software animation tool Synfig Studio.
The first thing to do when attempting an animation like this is to watch the source video frame by frame and jot down a list of key-frames – the frames where something starts or stops happening. I use a piece of free software called Avidemux to play video frame by frame. Avidemux is like a Swiss Army knife for video and I find it handy for all sorts of things.

Video in Avidemux
I write key-frame lists in text file that I keep with all the other files for a project. I used to jot the key frames down on a pad, but I’ve found using a text file has two important advantages: it’s neater and I can always find it! Here is my key frame list in Gedit, which is my favourite text editor:

Key-frame list in Gedit
After I have my key-frame list I then do any experimenting I need to do if there are any parts of the sequence I’m not sure how to achieve. It’s always good to do this before you start a lot of work on graphics or animation so that you don’t waste a lot of time creating things you can’t eventually use.
The ATV Today title sequence is mostly straightforward, as it uses techniques I’ve already used in the Spotlight South-West titles I created last year. However one thing I was not too sure about was how to key video onto the finished sequence.
Usually, when I have to create video keyed onto animation I cheat. Instead of keying, I make “cut-outs” (transparent areas) in my animation. I then export my animation as a PNG32 image sequence and play any video I need underneath it. This gives a perfect, fringeless key and was the technique I used for my News At One title sequence.
However, with this title sequence things were a bit trickier – I needed two key colours, as the titles often contained two completely different video sequences keyed onto it at the same time.

Two sequences keyed at once
Therefore I had to use chromakeying in Kdenlive using the “Blue Screen” filter, something I had never had a lot of success with before.
The first part was simple – I couldn’t key two different video sequences onto two different coloured keys at once in Kdenlive. Therefore I had to key the first colour, export the video losslessly (so I would get no compression artefacts), then key the second colour.
The harder part was making the key look smooth. Digital keying is an all or nothing affair, so what you key tends to have horrible pixellated edges.
Very nasty pixel stepping on the keyed video
The solution to this problem was obvious, so it took me quite a while to hit upon it! The ATV Today title sequence is standard definition PAL Widescreen. However, if I export my animation at 1080p HD and do my keys at HD they will have much nicer rounded edges as the pixels are “smaller”. I can then downscale my video to standard definition when I’ve done my keying and get the rounded effect I was after.

Smooth keying, without pixel stepping
The other thing I found is that keying in Kdenlive is very, very sensitive. I had to do lots of test renders on short sections as there was only one “Variance” setting (on a scale between 1 and 100) that was exactly right for each colour.
So now I was convinced I could actually produce the sequence, it was time to start drawing. I created all of my images for the sequence in Inkscape, which is a free software vector graphic tool based around the SVG standard.
However, in order to produce images in Inkscape I needed to take source images from the original video to trace over. I used Avidemux to do this. The slit masks that the film sequences are keyed on to are about four screens wide, so once I had exported all the images I was interested in I needed to stitch them together in the free software image editor The GIMP. Here is an example, picked totally at random:

She'll catch her death of cold…
Back in Inkscape I realised that the sequence was based around twenty stripes, so the first thing I did before I created all the slit mask images was created guides for each stripe:

These guides saved me a lot of time
The stripes were simply rounded rectangles that I drew in Inkscape. It didn't take long to trace all of the slit masks for the title sequence. Two of the masks were repeated, which meant that I didn’t have as many graphics to create as I was fearing.
Once the slit masks were out of the way I could create the smaller items such as the logo:
ATV Today logo created in Inkscape
And, with that, all the Inkscape drawing was done. It was time to animate my drawings now, so I needed to export my Inkscape drawings into Synfig Studio. To do this I was able to use nikitakit’s fantastic new Synfig Studio SIF file Exporter plug-in for Inkscape. This does a fabulous job of enabling Inkscape artwork to be used in Synfig Studio, and it will soon be included as standard in Inkscape releases.
When I did my Spotlight title sequence I exported (saved) all of my encapsulated canvases (akin to Symbols in Flash) that I needed to reuse within my main Synfig file. This was probably because I came to Synfig from Macromedia Flash and was used to the idea of having a large file containing all the library symbols it used internally.
I have been playing with Synfig Studio a lot more since then, and I realised a far more sensible way to work was to have each of what would have been my library symbols in Flash saved as separate Synfig files. Therefore I created eight separate Synfig Studio files for each part of the sequence and created a master file that imports them all and is used to render out the finished sequence.

The project structure
This meant that my finished sequence was made up of nine very simple Synfig animation files instead of one large and complicated one.
The animation itself mainly consisted of simply animating my Inkscape slit masks across the stage using linear interpolation (i.e. a regular speed of movement).
I could type my key-frames from my key-frame text file directly into the Synfig Studio key-frame list:

Key-frames for one part of the animation
The glow was added to the ATV Today logo using a “Fast Gaussian Blur”, and the colour was changed using the “Colour Correct” layer effect – exactly the same techniques I used in the Spotlight South-West titles.
ATV Today logo in Synfig
In order to improve the rendering speed I made sure I changed the “Amount” (visibility) of anything that was not on the stage at the present time to 0 so the renderer wouldn't bother trying to render. You do this using Constant interpolation so that the value is either 0 or 1.
I had a couple of very minor problems with Synfig when I was working on this animation. One thing that confused me sometimes was the misalignment of key-frame symbol between the Properties panel and the Timeline.
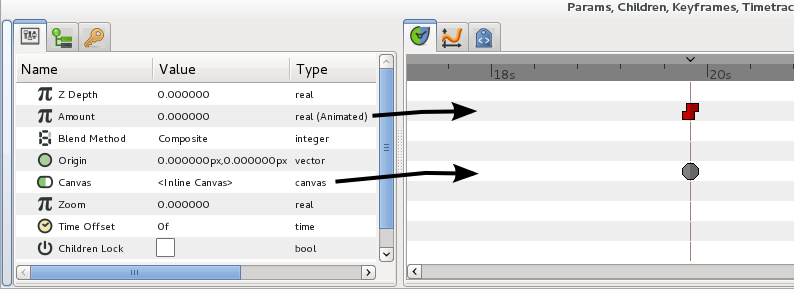
This misalignment can be very confusing
As you can see above, the misalignment gets greater the further down the “Properties Panel” something appears. This makes it quite hard at times to work out what is being animated.

Some very odd Length values indeed!
Another problem I had was that the key-frame panel shows strange values in the time of length columns - particularly if you forget to set your project to 25 frames per second at the outset.
However, overall I think Synfig Studio did brilliantly, and I would chose it over Flash if I had to create this sequence again and could choose any program to create it in.
The most important technical benefit of Synfig Studio for this job was the fact that it uses floating point precision for colour, so the glows on the ATV Today logo look far better than they would have done in Flash as the colour values would not be prematurely rounded before the final render.
I rendered out my Synfig Studio animation as video via ffmpeg using the HuffyUV lossless codec, and then I was ready to move onto Kdenlive and do the keying.
Obviously I needed some “film sequences” to key into the titles, but I only have a small selection of videos as I don't have a video camera. To capture video I use my Canon Ixus 65, which records MJPEG video at 640 x 480 resolution at 30fps.

My 16mm film camera
Bizarrely, when the progressive nature of its output is coupled with the fact it produces quite noisy pictures, I’ve found this makes it a perfect digital substitute for 16mm film camera!
I “filmised” all the keyed inserts, so that when they appear in the sequence they will have been filmised twice. Hopefully, this means I’ll get something like the degradation in quality you get when a film is then transferred to another film using an optical printer.
Once the keying was done the finished sequence was filmised entirely using Kdenlive using techniques I've already discussed here.
And so, here’s the finished sequence:
Although I’m not happy about the selection of clips I’ve used, I’m delighted with the actual animation itself. I’m also very pleased that I’ve completed another project entirely using free software. However, I think the final word should go to Roddy:
Thanks for the link. I had a bit of a lump in my throat, seeing those titles scrolling across, hearing the music, while munching on my Chicken and Chips Tea… blimey, I was expecting Crossroads to come on just after!If you are interested in ATV, then why not buy yourself a copy of the documentary From ATV Land in Colour? Three years in the making, over four hours in duration, its contains extensive footage (some not seen for nearly fifty years) and over eleven hours of specially shot interviews edited into two DVDs.
No comments:
Post a Comment