Going through my old Flash files, I stumbled across an early version of this image, which I first produced in 2005. I didn’t know how to make it look realistic then, but I’ve since been given lots of good advice from Rory Clark. This new version was produced in Inkscape and aged in The GIMP.
In case you’re wondering, these were all real IBA Transmitters.
A lot of the Flash animation on the internet consists of characters blinking whilst the camera pans or zooms Ken Morse style. I can sympathise – the mere thought thought of, for instance, producing a walk cycle for an animated character can be really terrifying.
Indeed, I have a couple of projects on the back burner that I’ve put off for just that reason – they would require me producing an animated walk cycle and I really didn't know where to start.
Sammy The Chamois
I remember producing a walk cycle for a Flash game called Sammy The Chamoisfrom Alan Scragg's drawings. The walk cycle I produced was ridiculous and broke every known rule of anatomy and physics. Scraggie said he loved the way I’d broken all the rules in Sammy’s walk – I was too ashamed to admit that was because I didn't know what the rules were!
However playing with Synfig Studio gave me a new impetus to think about animation again, and I started searching for walk cycles on the internet.
Dermot O’Connor’s website
I was lucky enough to come across a brilliant web tutorial in Flash by the Irish animator Dermot O’Connor. Dermot explains, over four videos, how to produce the classic Preston Blair animated walk cycle in Flash in the most clear and concise way imaginable. If you have ever been interested in animation I recommend that you look at them.
Having looked through these tutorials, I thought it would be a good exercise to produce Dermot’s rig in Synfig Studio and try animating the character in Synfig Studio instead of Flash. The term “rig” is a rather pretentious term for what is basically the digital version of a paper puppet jointed with brass paper fasteners.
Dermot’s Rig In Synfig Studio
Producing the rig in Synfig Studio was very straightforward. I simply traced Dermot’s drawing using Bline layers (a Bline layer is a layer made up of Bézier curves). The only tricky thing was getting the centres of rotation in the correct position. In Synfig Studio each Bline’s origin (and hence its centre of rotation) is the centre of the screen. That means you need to trace the shape, move it to somewhere near the centre of the screen to get the centre of rotation correct, and then move it back into position.
This became even more fiddly when I created Paste Canvas layers (what would be nested symbols in Flash) as you had to do a lot of mucking about to get the origin points correct. However, the great thing about Paste Canvas layers is that is completely explicit if a layer has other layers nested inside of it. That meant I didn't need to use Dermot’s asterisk convention to denote nesting.
Rotation Layers
The other main difference between a Synfig Studio rig and a Flash rig is that the rotation is provided by a rotation layer, so they had to be added to the rig amongst the other layers.
The bright orange points are “linked”
For the arms and legs, I linked the two common nodes together so I could change the shape of the arms and legs in exactly the same way as Dermot could on his Flash rig.
Once the rig was set up, I could start animating. This was much easier in Synfig Studio than it would have been in Flash. The great thing about Synfig Studio was that I didn’t have to worry about shape hints for shape tweening. I didn’t have to decide whether I wanted a shape tween or a motion tween. I didn’t have to worry about creating new time-lines for nested layers and I could name my key-frames with meaningful labels rather than abbreviations such as “c” for “contact”, and then jump to them by clicking on the JMP in the layers panel.
My key-frames panel
The main disadvantage of Synfig Studio over Flash for animating is the lack of an outline mode. This meant that you have to do more layer hiding to animate the left hand leg and arm than you would in Flash.
There were a couple of other niggles in Synfig Studio – firstly when moving multiple layers you had to make sure the canvas window has the focus before using the arrow keys. This became very annoying until I learnt to do it instinctively. Secondly, it would be great if there was a visual indication of whether a node has merged or split tangents as there is in Inkscape.
This is what I did in ten minutes in Synfig Studio – it would have taken me a lot longer to achieve in Flash:
The walk cycle so far…
It's not finished, as the arms are still very mechanical and I haven't put the bend in on the feet. However thanks to Dermot I now have the both the confidence and the knowledge to try and working with my own projects either in Flash or Synfig Studio.
You can download the Synfig Studio rig I made from the Synfig Studio forum here.
If you’ve been reading my blog for a while, you’ll know that whenever my attention turns to the Midlands it’s usually at the prompting of my friend Roddy Buxton.
Roddy is a lighting engineer, electrician and visual effects designer. He is now based in South Yorkshire but grew up in ATV Land. Roddy’s TV career started in the Central Television film department, working as a spark on such programmes as Peak Practice and Boon.
As with Oliver Postgate, Roddy’s branching out into visual effects design happened quite by chance when a director noticed how practical he was and decided he’d be the perfect person to knock up a semi-practical suitcase nuke for a film!
In 2009 Roddy thought he’d like to have a go at creating a working replica of the ATV station clock from the sixties. As far as I know, this clock only exists as an off-air photograph in the Transdiffusion archive.
Station clocks used to be shown at numerous times during the day by all televisions stations from the 1950s to the early 1990s. Giving the correct time was not only seen as a valuable public service to the viewer, but the clock equipment was used to sync the studio’s signals with external sources. This was vital to prevent visual glitches such as this:
Roddy asked if I could supply him with the artwork in a format suitable for printing, something I was only too happy to do. I sent him two Inkscape files, one for the clock face, the other for the hands:
Watch your face…
…and hands.
Roddy soon had other things on his mind – a new addition to his family! – and I thought no more of the model clock.
However, earlier this year Roddy started asking me questions about my Flash recreation of the BBC Schools dots. The BBC Schools dots were shown in the minute immediately preceding BBC One’s programmes for schools and colleges between September 1977 and June 1983.
In the final year the dots were digitally originated using technology similar to Richard Russell’sGNAT clock, but before that the dots were a mechanical model in the “Noddy room”.
The Noddy room was a special studio in the BBC that held various mechanical models and 12" by 10" captions. These were captured in black and white by a remote controlled camera that used to “nod” up and down as different ones were selected – hence the name “Noddy” room. Colour was usually added electronically to the images before they were broadcast.
Roddy discussed the lighting for the dots:
The lighting for the BBC Noddy wasn't anything specialised. It consisted of two P38 flood lamps (available from all good DIY/Electrical stores) – these are likely to have been photographic lamps – however the only difference being is the price and box they come in. They are the same voltage, wattage and colour temp. The lamps were attached to the camera, so wherever the camera was pointing that area would be lit.
So I supplied Roddy with the dots artwork as an Inkscape SVG file and I also uploaded my latest recreation of the dots in Flash to YouTube:
In May I was delighted to receive a mail from Roddy with a photograph of this prototype dots model:
Prototype dots, courtesy Roddy Buxton
Roddy said:
The clock face is made from hardboard; though I am not happy with the results; as the dots are not that hard edged. I think I will end up using this clock face as a template to make the actual clock out of punched steel/aluminium – that way I can get hard edged dots.
Here are some more of Roddy’s pictures of making the prototype:
Holes drilled through the hardboard
Temporary captions applied to check sizing
Matt paint added to remove the reflections
I thought the prototype looked absolutely fabulous, and by now I was looking forward to seeing the finished product enormously. I didn’t have long to wait – on the 11th June Roddy wrote to say:
The artwork for the BBC “Dots” has arrived in printed form. The company I have used did all of my printing for me for £11 including P&P, and to the correct sizes – and in a matt finish too.
And on the 6th of July I finally got to see how the final schools dots model was progressing:
I showed the progress so far to my friend Rory Clark who summed it all up beautifully when he said:
Bloody hell – they're impressive!
Not only that, but Roddy had started work on something else as well!
In Colour – the ATV Station Clock replica
Roddy assures me:
Another week and the dots will be vanishing ;-)! (Finally)
I’m very much looking forward to that. And I’m also hoping Roddy will also recreate some other models from times past – and it looks like I’m in luck!
Roddy tells me:
On the “to do list” – I have always wanted a BBC Globe – so will look at that. The “Diamond” is pretty easy to do (will definitely look at that!)
I’ve always found that I learn far more about a piece of software through playing rather than working and that’s certainly been the case with the offline video editing program Kdenlive. I’ve also found that when you have a definite goal in mind then “the software doesn’t do that” no longer becomes an option and you use the software far more inventively in order to achieve it.
And so it proved when I decided, using Flash 8 and Kdenlive, I’d try and recreate the title sequence for ITN’s News At One. I first saw this title sequence back when the programme was called First Report – that was before the soporific Aussie soap The Sullivans pushed the programme to its more familiar one o’clock slot.
Here are the original News At One titles that someone culled from TV Ark:
As you can see, it’s quite a complicated title sequence and people who know far more about this sort of thing than me have noted how hard it would have been to achieve in the 70s. They’ve always been very, very good technically at ITN.
Although I haven’t got a clue how ITN did it, I decided on the basic approach of having two layers of video in Kdenlive for my version.
The bottom layer would be the typing hands (or paws in my case – thanks Lionel!). These were shot on my little Canon Ixus camera and then put through the Kdenlive “Threshold” filter and coloured with, of all things, the MSU Old Cinema filter.
Lionel touch-typing
The top layer of video would consist of the zoom out of the Houses of Parliament’s clock tower (replaced by the block of flats where I live) which fades out, and the photo montage of odd people and drab places (replaced by pictures of my daughters, their toys and things in the square outside).
Creating the montage for the top layer was straight forward. I loved the fact that, on the original, the outlines around the images were all different widths, and some of them were even bent out of true. Even the top of the News at One logo was at an angle!
Creating the montage in Flash
The problem I faced was how to merge these two layers. My first thought was to use a Chroma key, but this gave me all sorts of problems and some rather nasty digital fringing that looked like anything but 70s television.
Click to enlarge
What I really needed was to be able to export transparency from Flash into Kdenlive – and it turned out that I could. The first step was to export the sequence out of Flash 8 as a PNG sequence at 24 bits per pixel with alpha channel, like this:
Getting transparency from Flash to Kdenlive
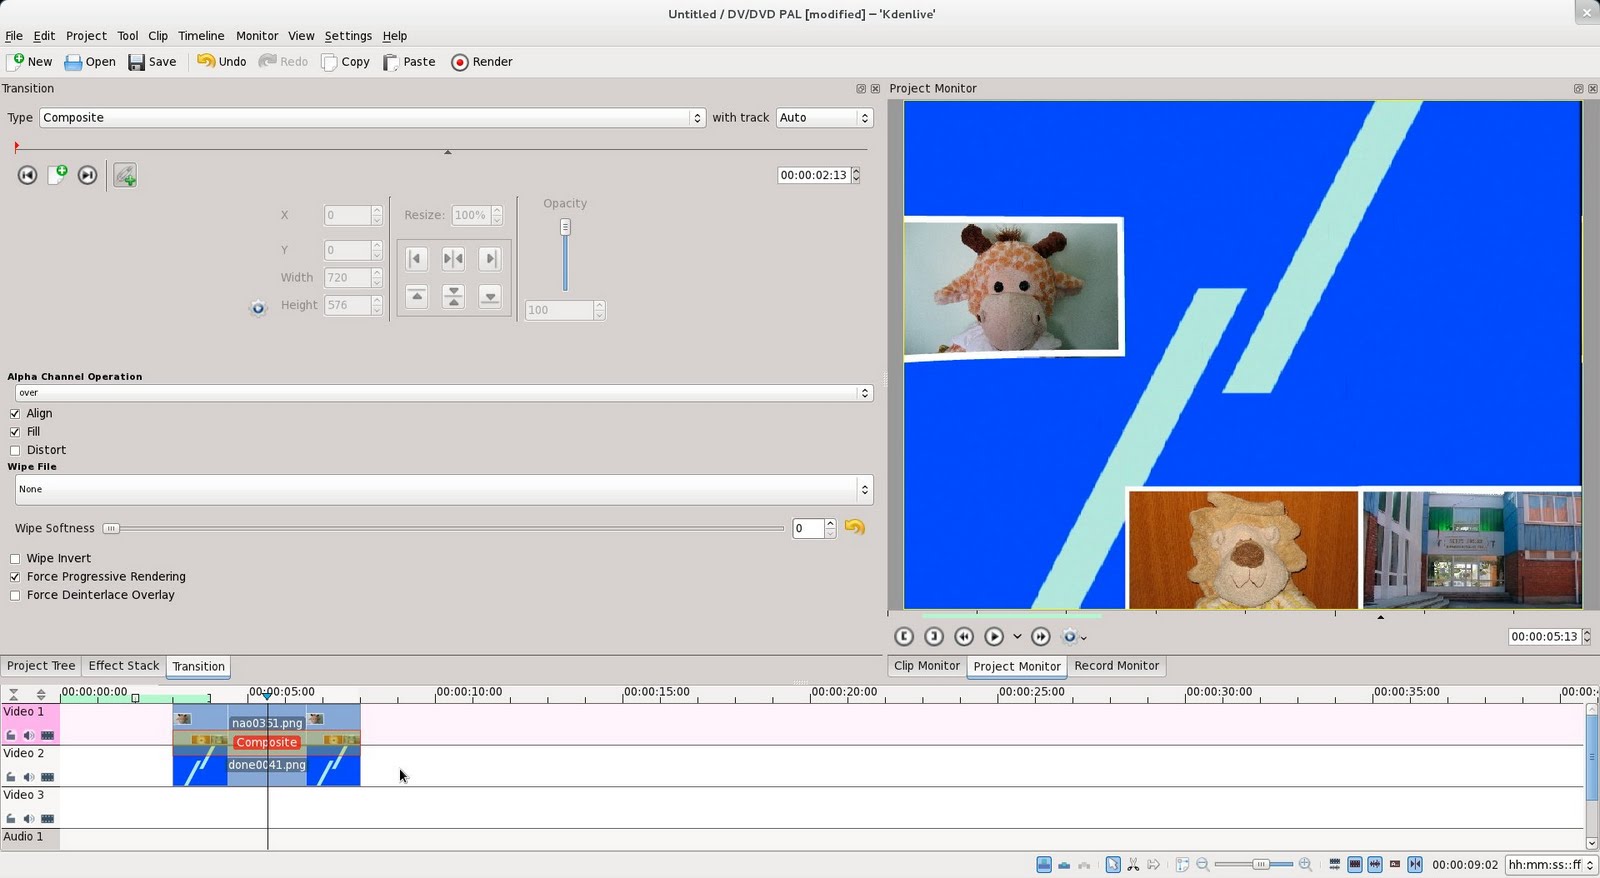
Then I could import the PNG sequence into Kdenlive, and use a Composition transition to knit the two layers together.
Click to enlarge
PNG sequences are the best thing ever invented for my work – everything can use them perfectly and they mean that I can transfer work between packages without losing quality or suffering odd effects.
So, here’s the finished sequence:
Now I understand keying properly I can do loads of things I thought I simply couldn’t do before. And all because I thought I’d do a little sequence to make my daughters laugh.
I’ve finally worked out I can put YouTube videos in my blog that can be viewed without having the Flash plug-in installed. Which is handy for me, as I don’t have the Flash plug-in installed. And presumably it’s also a boon for anyone using one of those ingenious new Apple etch-a-sketch things.
So, now I can watch stupid rubbish without using my daughters’ computer, here’s some that I (and Rory) made earlier…
My interest in all things Granada was piqued recently when I came across a copy of "Easy Go" by Nick Glennie-Smith. This was the breezy mid-80s start-up piece that was usually heralded by a very naff block graphic transition and ended up with Colin Weston talking over it cheerily in-vision to let us know how parky it was outside.
It's blue, it's CGI - it's just like Avatar!
I've always wanted to have the Granada block graphic transition available as a Flash file should I ever need it, so when I got some free time recently I decided to recreate it. For source material I had an old RealVideo file of a VHS recording of a Granada closedown which I downloaded from the web many years ago.
The Granada transition is based on a grid of 32 x 24 squares, meaning that each square was 24 pixels in size making up the full 768 x 576 PAL resolution. So the first thing I did in Flash 8 was change the grid from 18 pixels to 24 pixels. I then added guides every four grid squares to help positioning on screen.
Setting the Flash 8 grid
To help me create the animation, I needed to view the video file frame by frame in Avidemux. However Avidemux didn't like my rather antiquated RealVideo source file. Luckily I was able to convert the RealVideo file into an mpeg file using the command line video tool ffmpeg:
After that I trimmed the resulting mpeg file in Avidemux so that it only contained the transition.
I didn't bother turning the video file into an FLV to import into Flash - just as well as it turned out. I had enough problems with memory as it was! As I run Macromedia Flash 8 using the WINE compatibility layer for GNU/Linux, Flash 8's performance tends to struggle with files over about a megabyte in size.
My approach was to use a symbol for my pixel, and build up each frame using multiple copies my pixel symbol.
A really stupid way to do it...
Although it worked fine at first it was a big mistake in retrospect as it meant I eventually created a large, unresponsive Flash file. This is because when you use Flash in WINE for large files you have to use Save And Compact... for each save to stop the file growing exponentially in size and eventually corrupting. Worse still, whilst it is saving Flash becomes completely unresponsive.
As I worked on the Granada transition each Save and Compact... took longer and longer and would often throw me out of Flash completely so I had to reload it again. Flash also became increasingly slow and unresponsive while I was working. It got so bad that in the end the majority of time was spent "Saving and Compacting" rather than animating.
By the time I'd finished it had taken me an hour to do one second of animation - absolutely ridiculous! My end result was 2.4MB Flash File that took about six minutes to save after each alteration but output a SWF animation that was about 6K in size.
In order to be useful obviously needed a file I could actually work with sensibly. After breaking apart all the square symbols I got a file that was a more manageable 237K - and that could be saved instantly. However the output .swf file went up in size several times to nearly 23K.
A more sensible approach
I kept my original Flash file so that at a later date I can create a 16:9 aspect ratio version of the Granada transition. But I think I'll wait until the performance of Flash 8 improves in WINE before I tackle that one!
The only other problem I had when creating the transition animation was the RealVideo file I had dropped the odd frame, so I had to create two frames from one at certain points.
Finished Transition in Flash Player
Once I had the Granada transition, I decided it would be a shame not to put it to some kind of use, so I decided to recreate a Granada closedown from the mid-80s. I had a recording of a Granada closedown in another ancient RealVideo file and luckily I only needed two extra items - the Granada computer generated station clock and the Granada computer generated ident caption.
I was lucky enough to have some excellent source material for the Granada station clock - the output of the actual clock generator itself courtesy of Greg Taylor. Having the clock output also allowed me to get the RGB values of the actual colours exported by the electronics used to generate the clock and caption. Looking at off-air recordings of the clock and caption in use, I reckon these were often tweaked a bit in the gallery to make them a more Granada-ish powdery blue.
The clock itself was an interesting job. A couple of years ago I would have drawn and animated the entire thing in Flash 8. However, I did a mix and match for this. I drew the bottom of the clock with the Granada Giro G and namestyle in Inkscape 0.47. Then I exported the result as an EPS, imported the EPS into Flash 8 and then drew and animated the clock face itself.
Clock base created in Inkscape 0.47...
I was quite pleased with this - it meant I could use the best tool for each bit of the job. Inkscape is far more suited to drawing logos and lettering, whereas Flash is far more suited to both drawing and animating things like clock faces.
... and finished off in Flash 8
The clock was a pretty quick job, polished off in under an hour from start to finish.
Inkscaped Granada CGI ident
The Granada electronic caption was another quick job, as I had a large, high quality scan of a genuine caption card from Matthew Gulliver's collection to work from. This caption dated from the same era as the closedown and the proportions of both the logo and lettering were identical.
Once I had all the bits and pieces I stuck them together in Flash 8 and exported the resulting sequence as a PNG sequence. I turned the PNG sequence into an uncompressed AVI file using VirtualDub. Then I imported to AVI file into Avidemux to add audio and export the result as an H.264 video/MP3 audio MP4 file.
When I drew my recreation of the IBA electronic test-cardETP-1 in Macromedia Flash, I only captioned it with the large IBA caption. As I only needed the card to recreate an HTV start-up sequence, I never bothered adding the two best known captions that appeared on the card - for Channel Four and S4C.
IBA ETP1 recreated in Macromedia Flash 8
This always annoyed me, so whilst I was listening to a podcast this morning I finally decided to finish it off. I used Inkscape to draw the lettering - I'll export it as an EPS file for import into Macromedia Flash at a later date.
Beautiful calligraphic script
If you enlarge the image below, you will see that letter is designed on a 10 x 10 pixel grid, with 2 pixel leading between each letter.
Snap to Grid and Clone Object are your friends
Now all I need to is some KPM tracks by Keith Mansfield and I'm back in the early 80s again.
Recently I've been playing about recreating various SMPTE and custom made film leaders in Flash 8 and Inkscape. One of the most interesting for me, and one that reminds me of Blue Peter for some reason, is the BBC's own film leader. Here it is:
While working on film leaders, I've settled upon a hybrid Flash/Inkscape workflow in which I create the individual frames in Inkscape as Inkscape SVG files.
SMPTE Society Leader frames created as SVG files
I then export them all as EPS (Encapsulated PostScript) files so they can be imported into Macromedia Flash 8. You could export all the files from Inkscape by hand, but to save time I use a little Bash shell script instead:
#!/bin/bash
#
# Export all SVG files in a directory as EPS files

for i in *.svg; do
    inkscape $i --export-eps `basename $i .svg`".eps"

done
Then I import the EPS files into Flash and I'm ready to start putting the animation together.
I've always had a fascination for the BBC schools diamond. In case you are not familiar with it, the BBC schools diamond was a mechanical model devised by Murray Andrew for use in the last two minutes of intervals before BBC programmes for schools and colleges.
I am ancient enough not only to remember it, but to have watched it as nature intended at primary school every week before a programme. I was always mesmerised by it, but my unimpressed teachers used to complain that it wasn't as easy to understand as ITV's schools clock.
The diamond mechanism itself is fascinating and it was very satisfying to work out how it worked.
The diamond animation as outlines in Flash
The four striped version of the diamond was originally only a static caption card, intended for use in place of the mechanical model in intervals less than two minutes in length.
I always wanted to see it being animated. Hence another lame mock that I produced, as always, in Macromedia Flash 8.
These days, if at all possible, I like to use Inkscape for creating vector artwork. At one time I used Macromedia Flash 8 for all my vector illustration work. But these days, if I have to create artwork in Flash it makes me feel like I'm being forced to write with my left hand.
There are also a number of things I can achieve easily in Inkscape that are harder to do in Flash. One recent example was when I was working on the animated menu for Simon Buckley's new website. I was given a signed off design as a bitmap illustration and was asked to turn the design into a vector animation in Macromedia Flash format.
Most of the design was very straightforward to achieve, but there was one part that was more fiddly. The name of the website was written in a font called Chalkdust, and it was fringed with a thick black outline. This is one of those things that looks simple to do until you actually try and do it in Flash.
The way I tackled getting an attractive vector outline for the Chalkdust text was to enter the Chalkdust text into Inkscape, turn the text into vector outlines and then use the Inkscape "Linked Offset" option to enable me to expand the text outline to the desired extent.
Cleaning up Chalkdust in Inkscape
Chalkdust, like most typefaces, has very messy vector outlines with large amount of redundant nodes. This meant that the resulting expanded outline needed a lot of cleaning up and simplification - a job I could do very quickly with the node tool in Inkscape.
It's always worth making your vector outlines as clean as possible. In the old days of dial-up modems this was because you hand to shave every last byte off of download times - I used to hand optimise everything I did in Flash to get Flash animations within bandwidth quotas set by customers. However these days it's because the more elegant your outline the better it looks (due to the vagaries of anti-aliasing routines) and the better it animates.
Cleaned up outline
The finished outline was soon cleaned up and ready for transferring from Inkscape 0.47 to Flash 8.
After some experimenting, I found that my favoured method of transferring vector Inkscape artwork into Macromedia Flash 8 is the Encapsulated Postscript or EPS format.
There is one important thing to be aware of when transferring between the two programs using this format. Take this Inkscape vector drawing as an example - it's 400 by 400 pixels in size.
400 x 400 pixel Inkscape drawing...
When imported into Macromedia Flash as an EPS it arrives as a vector drawing 320 by 320 pixels in size.
...becomes 320 x 320 pixel Flash drawing.
There is absolutely no way around this - Flash thinks EPS files should be 72dpi, Inkscape thinks EPS files should be 90dpi and neither program lets you do anything about it.
However, it's simple enough to use the Flash 8 Transform panel to scale all the EPS files you import into it by 125% to make up for the difference in dpi between the two packages.
Doing this becomes automatic after a while!
One final point to bear in mind with EPS transfers between Inkscape and Flash 8 - avoid gradient fills. These always seem to be imported as bitmaps in Flash 8. You will have to recreate any Inkscape fills again from scratch in Macromedia Flash so I never bother creating them in Inkscape in the first place.
The finished animated menu can be seen here. I've also written a blog post about my preferred method of getting my vector drawings from Flash 8 into Inkscape here.
Another day, another video of a rather lame mock uploaded to YouTube. We're back to 4:3 again, and a short video a did to teach myself how to use Adobe Premiere Elements:
Before I bought Premiere Elements in early 2008 I'd never done any video editing before, so it was all very new to me. I did huge a number of videos to experiment and work out a good workflow to transfer my material from Flash or Fireworks to video. I recorded my work over and over again onto the same DVD-RW and then scuttled downstairs to the television to see how the results looked on a CRT television rather than an LCD monitor. As you can see from this video, I hadn't yet worked out things like interlacing or how to age transparencies properly.
Although the first BBC 1 globe symbol I remember from my childhood was the black and cyan version with the italic "COLOUR" lettering, the first BBC 2 symbol I remember was the striped cylindrical 2. I saw this countless times waiting for Play School on weekday mornings or Play Away - the strange oasis that appeared between boring black and white films - on Saturdays. BBC 1 and ITV were showing wall to wall sport at the time due to their regulatory obligation to provide programming for the hard of thinking. Channel Four didn't even exist. Play School mornings were usually accompanied by a cup of Mellow Birds made with milk. Despite being Julie Steven's favourite beverage, it never seemed to dissolve properly back then, so you'd get little brown bits on the top...
When the computer generated ==2== symbol replaced the cylinder on BBC 2, I never really took to it. The cylinder's animation was far more interesting, so I often wondered what would have happened if the stripey cylindrical 2 had been kept but updated. The end result, my "lolly sticks" symbol was created in Swift 3D. The animation does a very similar thing to the cylinder - the coloured stripes rotate in opposite directions - but to make it more interesting the camera does a 270 degree trip around the stripes as they do so.
Swift 3D - click to enlarge
One interesting thing about the lolly sticks symbol is that I created it at 400 x 300 in Swift 3D. As I was exporting it in vector format as a .swf it didn't matter what size it was so long as the aspect ratio was 4:3. Vector 3D is something that Swift 3D really excels at, although it's very good at raster 3D as well. After more experimentation I'd later scrub this approach in favour of working at 720 x 576 and correcting in advance in Swift 3D itself for non-square PAL pixels.
Thin hairline 2 in Flash
To get the striped 2 into Swift 3D in the first place, I drew it in Macromedia Flash 8. I drew it as a series of hairlines, and then turned the hairlines into thick rounded strokes.
Exactly the same graphic, stroked in Inkscape
After doing this, I turned the strokes into fills, and exported the resulting graphic as an Adobe Illustrator file for importing into Swift 3D.
GNAT Flash - Click to Enlarge
The clock is my Macromedia Flash 8 version of BBC Engineer Richard Russell's computer originated GNAT (Generator, Network Analogue Time) clocks. The GNATs were used by BBC 1 and BBC 2 throughout the 1980s. There was even a rather nice yellow and blue Open University version for a few years. You can download a screensaver created using the final version of the GNAT software from Richard's site. Richard has also written an article that discusses the history of the GNAT.
Teacher's discipline problem #5435 - POW!!!!!!!!
The schools dots is again another one of my Flash 8 concoctions. This is the second version, where I finally got the font right! This, along with the clock, is the sort of animation that's very easy to do in Actionscript, but a real pain to produce a version you can export to use in video projects.
Henry Woolf was even better with Charlie than with Pinter
The slide was based on a BBC1 version I did around ten years ago now for the sadly soon to be defunct BBC Cult website. I simply traced a screen capture in Flash that the BBC supplied to me from the opening titles of the programme "Words and Pictures".
My treatment of the slide was very unsatisfactory - both in terms of the fading and blurring I used and the very bad banding that appears on the image. It looks very fake indeed, and one day I must get round to writing a post about how I would have gone about doing that job properly.
Just a note about the font - when I'm doing 70s stuff that requires Helvetica I tend to use URW++Nimbus Sans these days. I'll explain why in a post about Thames Television some other time.
The music is from one of my favourite programmes - 4Square - and was composed by Ian McKim. The music was designed as a tension bed underneath a computer generated (Acorn Archimedes) maze game and made for a very exciting minute of television.
Anyway, technically a rather unaccomplished little video of another lame mock. But it brings back lot of memories and I enjoy watching it from time to time.